-(1).png)
Onboarding Additional Listings in Guesty
When adding a new property, it’s important to follow a step by step process to ensure your listing is properly integrated and positioned for success. This guide will walk through the steps of integrating with Guesty, distributing the property to relevant OTAs (Airbnb, Vrbo, Booking.com, etc.), and connecting Touch Stay for digital guides. These steps form the foundation of your property’s technical setup and must be completed to ensure seamless operations and guest experiences.
While your team manages the technical build-out and distribution, Synchronest steps in to maximize performance. Our role is focused on pricing strategy and revenue management, ensuring your new property is optimized across channels and is strategically setup to perform.
Once you’ve confirmed an onboarding for a new property, we recommend that you reach out to our team before or at the same time as beginning your Guesty build-out. This ensures we can begin the revenue management onboarding process in parallel, keeping everything aligned and ready for launch. To initiate, simply email success@synchronest.com, and our team will prompt onboarding steps.
Guesty Setup Workflow and Distribution
Step 1: Import the Listing
-
Follow this guide (or watch the video) to pull your listings from Airbnb and import their data:
Step 2: Configure the Listing
Watch this overview video: The Property Page Overview
Key Items to Update
- Location & details → Property size
- Rooms & beds → Room arrangement (Managing a property room arrangement)
- Owner & license (if applicable) → License regulations (Adding a license number to a property in Guesty)
- Custom fields → Property custom fields (Setting up custom fields)
- Pricing → Contact success@synchronest.com to setup rate strategy
- Tax configuration → If different from account defaults, toggle off Use your account’s default settings and add the property-specific tax (Create a tax for a specific listing)
- Additional fees (if applicable) → Create fee for a specific listing
- Reservation policies → All applicable settings
- Calendar → Availability settings
- Task templates (sample below)
- If you need to add a new user/member/cleaner: follow these steps: Managing users
- Automation → Auto Response (sample below)
- Auto Reviews (sample below)
- Auto Tasks → Cleaning (Sample Auto Tasks)
- Saved Replies → If not already added, or to create property-specific replies (Managing saved replies)
- Marketing → Descriptions, photos, and listing on channels (if unlisted and you’d like to publish) (Marketing information in channels)
- Settings → Status in Guesty (if inactive and you want to activate) (Deactivating or activating a listing)
Sample Task Templates (for setting up cleaning tasks)

Sample Auto Response (for inquiries and instant replies):

Sample Auto Review (to send automatically after guest checkout):


Sample Auto Tasks (to automatically create cleaning tasks for each reservation):

Step 3: Integrate Digital Guide Software
- Touch Stay: Guide to Integrating Touch Stay
- If Touch Stay is already integrated and you want to match or sync additional properties:
- To confirm reservations are synced, check that the Touch Stay guide URL appears in the reservation’s Extra Information field.
Step 4: Launch Synchronest Revenue Management
After confirming a new property onboarding, contact us at success@synchronest.com before or as you begin your Guesty build-out so we can launch revenue management in parallel and guide you through the next steps.
Step 5: Distribution to OTAs
- VRBO: Publish a listing to VRBO
-
After publishing to Vrbo and once the listing is live, update the property details by going to:
Manage → Edit Property → Property editor → Property description
-

From there, configure the following:
- Your story
- Your photo
- Your property
-
About your host
- Booking.com: Publish a listing to Booking.com
- Before publishing, verify your payment settings and ensure that “Automatically add new properties to Payments by Booking.com” is set to On.
- To check this, go to your Booking.com Extranet dashboard: Finance → Payment settings → Overview

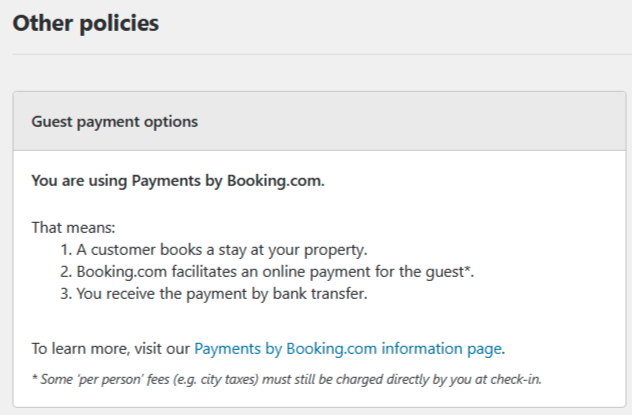
- Once the listing is live on Booking.com, confirm that “Guest Payment Options” is set to Payments by Booking.com.
-
You can check or update this in the Extranet dashboard: Property → Property policies → Other policies → Guest payment options

- You can also review and adjust other settings for the property from the property page by clicking Edit on each section. Key items we usually configure include:
- Photos (ordering and tagging)
- Property policies
- Children policies
- Guest payment options
- Guest information
- Additional fees & charges
- House rules
- How you receive bookings
- Reservation policies
- Cancellation and prepayment policies
- Room details
- Property layout
- Room amenities
- Your profile
- Profile type
- Host name
- Profile image
- About the property
-
About the host
- Booking Engine / Google Vacation Rental: New listings added to the Booking Engine or Booking Engine API connected to Google VR are automatically added to the Google integration. Guide to connecting Guesty listings to Google Vacation Rentals